Quick Facts
- The 68% Rule: According to recent home organization audits, nearly 68% of the perceived visual clutter in modern kitchens is caused by exposed power cables rather than the actual footprint of the appliances.
- Space Reclamation: Implementing professional cord management can reclaim up to 15% of usable countertop depth by consolidating tangled wires.
- Primary Solutions: Strategies range from artisanal wood risers and decorative "cookbook shields" to budget-friendly adhesive wraps and the famous "KitchenAid bowl trick."
- Safety First: Never use metal staples or nails to secure kitchen cords, as these can pierce insulation and create fire hazards in high-moisture areas.
The Hidden Cost of Cord Clutter
We’ve all been there: you spend thousands on Calacatta marble or sleek quartz countertops, only to have the entire aesthetic undermined by a chaotic web of black and grey plastic cords. As an editor, I often see kitchens that are architecturally perfect but feel "noisy." That noise is usually "visual static" caused by appliance cords. It is a frustrating reality of modern living—we love our air fryers, espresso machines, and high-speed blenders, but we loathe the "black spaghetti" they leave in their wake.
When we talk about kitchen styling, we often focus on the objects themselves—the vase of eucalyptus or the bowl of lemons. However, true design harmony is found in what you don’t see. To hide appliance cords on a kitchen counter, you can use a cord management riser like the Reds Wood Design box, conceal them behind a stack of cookbooks or a woven basket, or use adhesive cable wraps to secure wires to the back of the appliance. By addressing these cords, you aren't just cleaning; you're reclaiming your kitchen's design integrity.
1. The Designer Investment: Handcrafted Wood Risers
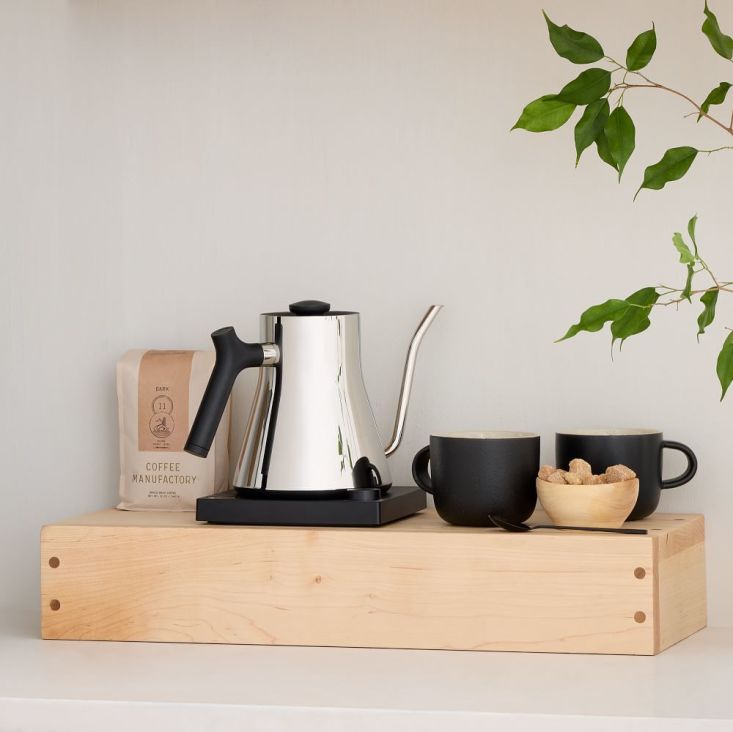
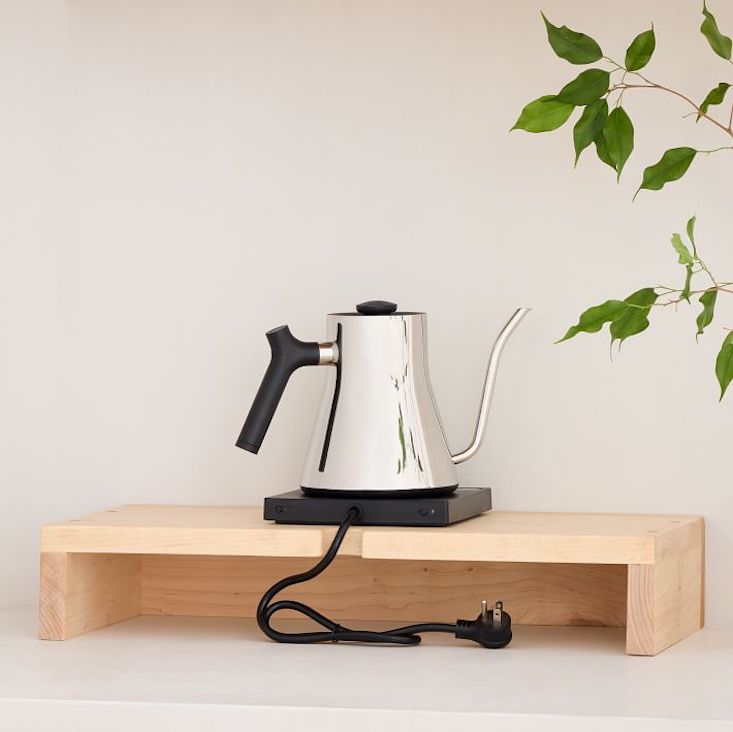
For those who view their kitchen as a sanctuary and are willing to invest in a permanent, high-end solution, handcrafted wood risers are the gold standard. These are not merely "boxes"; they are furniture-grade cord management systems designed to elevate the appliance while encapsulating the unsightly outlet and plugs.
The most sought-after version in the design community is the Reds Wood Design Appliance Cord Box. Often seen in West Elm-style editorial shoots, these boxes act as a platform for your heavy appliances. By placing your toaster or coffee station on top of a riser, the excess cord is tucked into a hollowed-out compartment underneath. This consolidates tangled wires into a single streamlined unit, instantly reclaiming that precious 15% of counter depth that is usually lost to "cord sprawl."

When choosing a riser, the material is paramount. You want it to either match your cabinetry exactly or provide a deliberate contrast.
- Walnut: Perfect for mid-century modern or moody, dark-toned kitchens. It adds a sense of warmth and luxury.
- Maple: Ideal for Scandinavian or "Organic Modern" aesthetics where light, airy woods dominate.
- Painted Finishes: Some designers opt for a matte black or crisp white to match the appliance itself, making the riser "disappear" into the machine's silhouette.
Pricing for these artisanal solutions generally falls between $299 and $349. While the price point is higher than a plastic clip, the impact is transformative. It turns a utility area into a curated "station."

2. The Layered Decor Approach: Baskets and Cookbooks
If you prefer a "styling-led" solution rather than a hardware-led one, you can use items you likely already own to create a visual barrier. This is what I call "The Layered Shield."
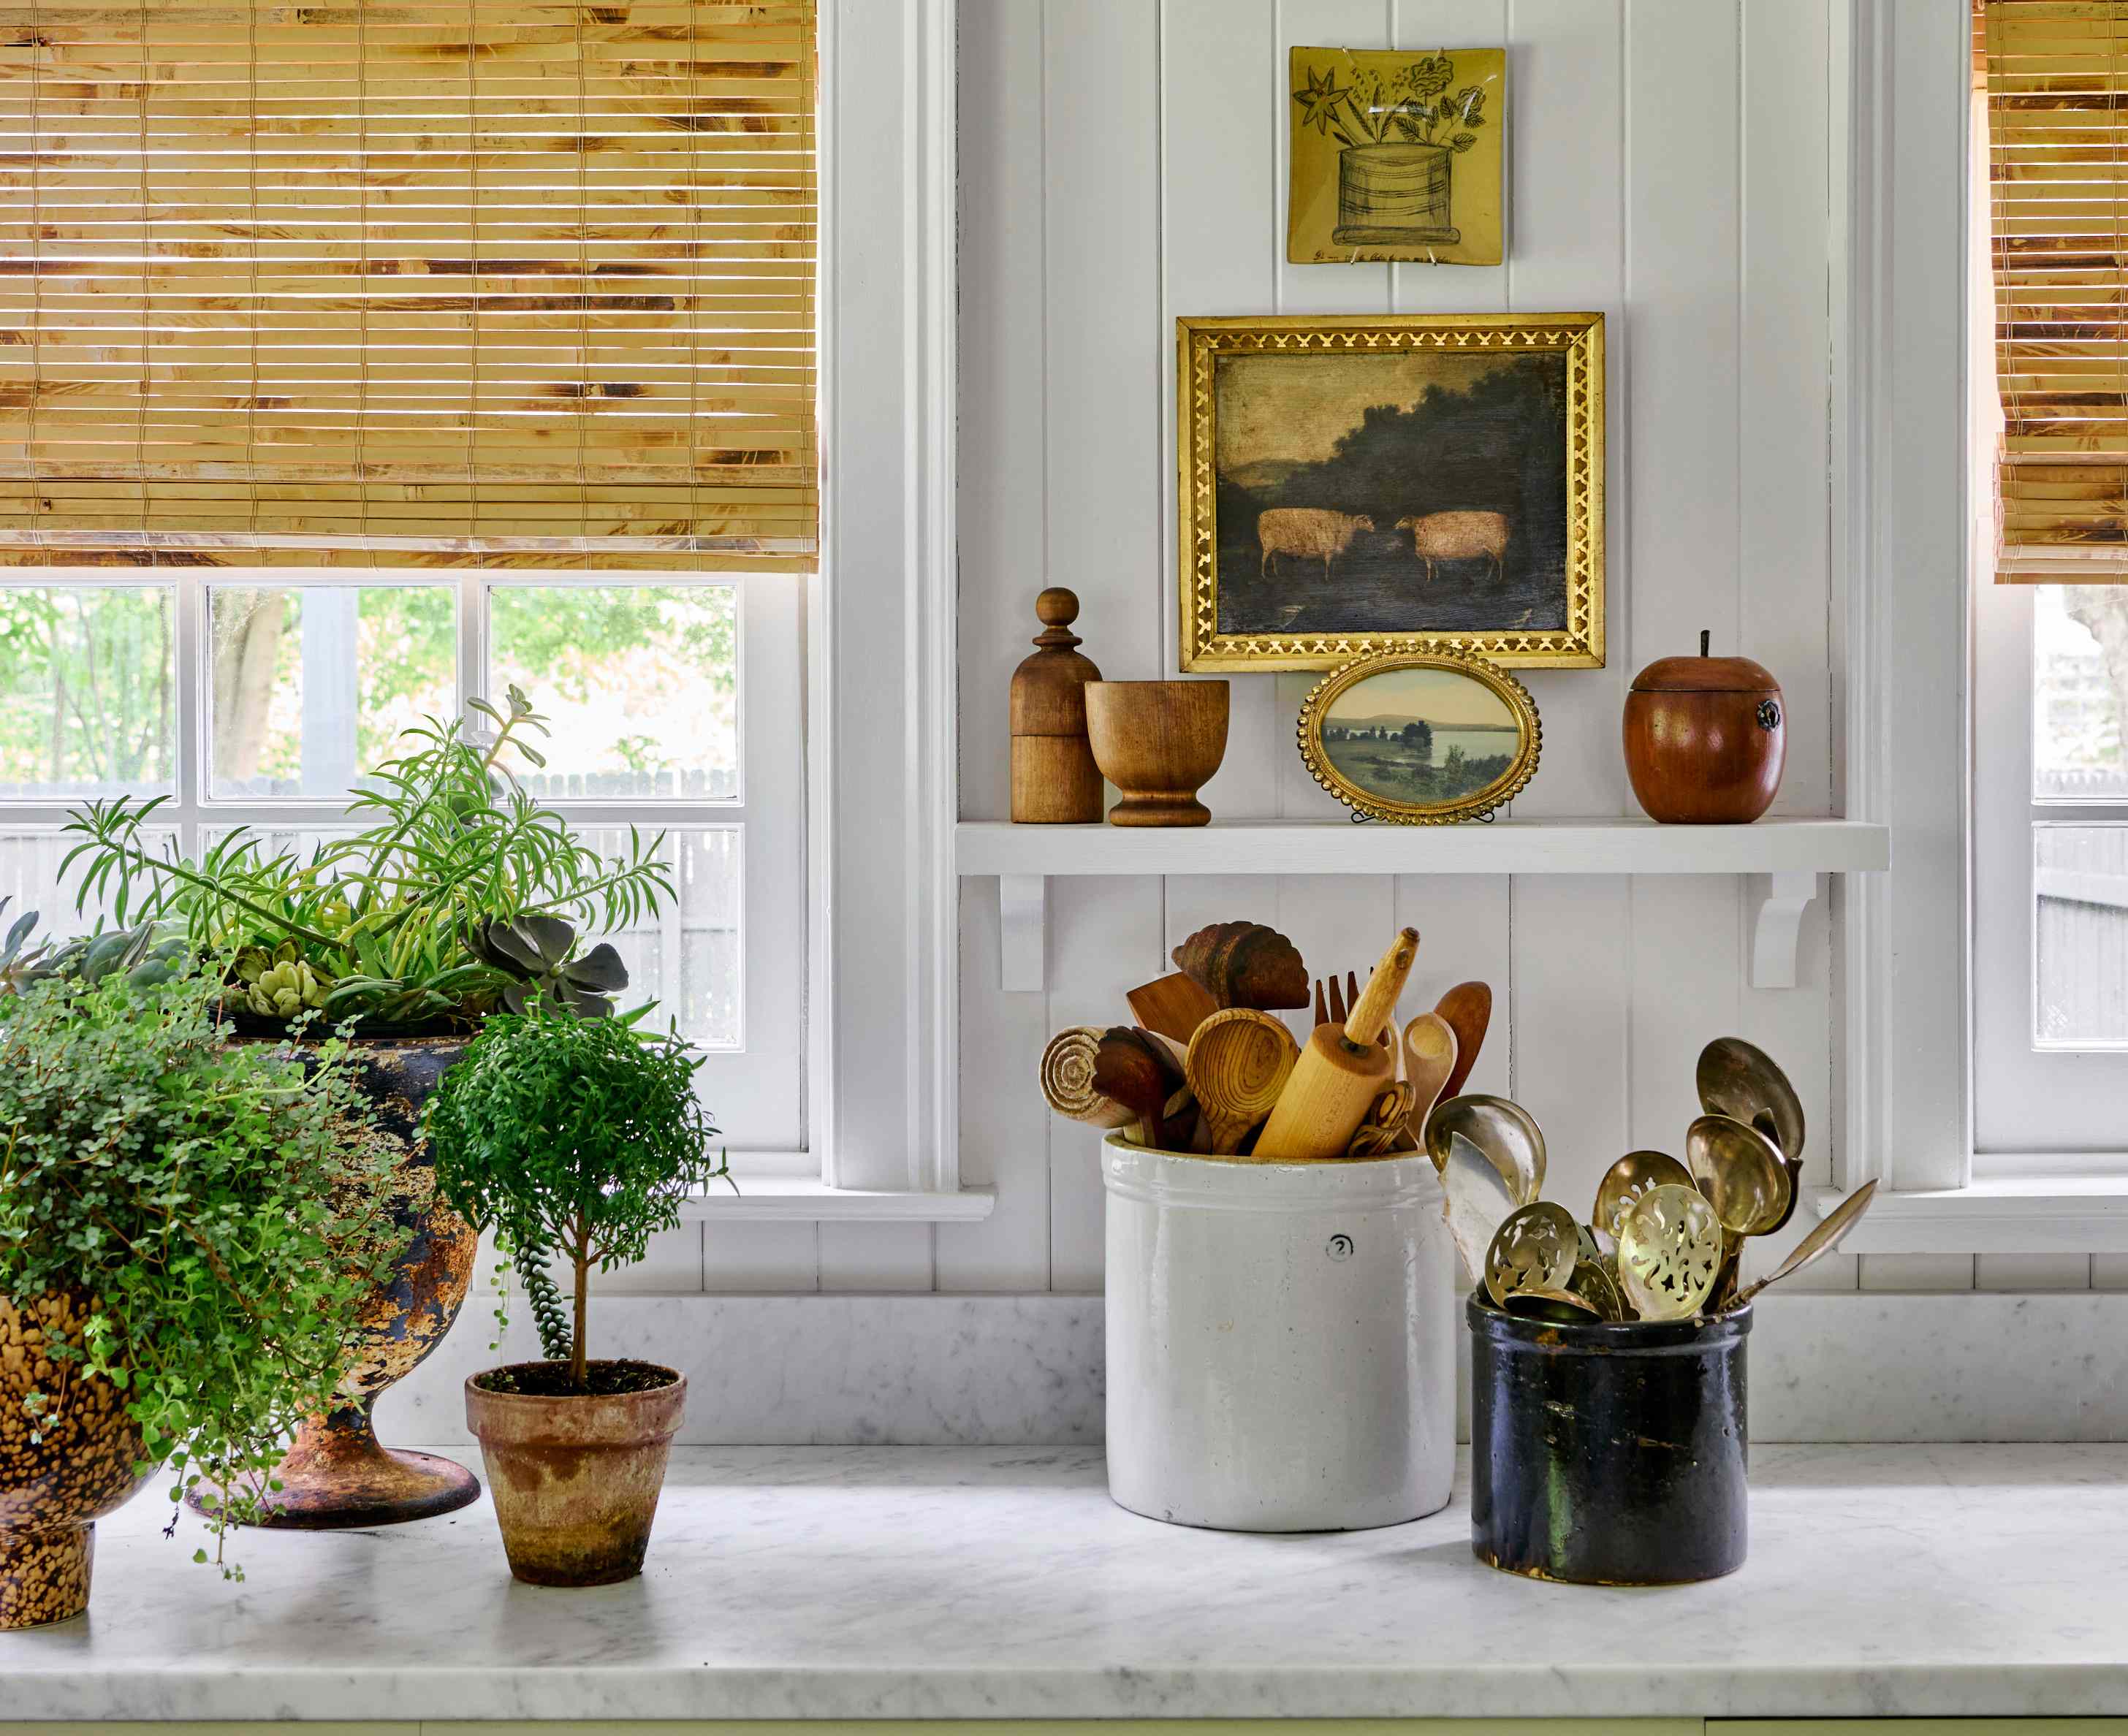
One of my favorite tricks is using a woven seagrass or rattan basket. If you have a cluster of smaller appliances—like a milk frother and a kettle—place them near a low-walled basket. You can coil the excess cords and tuck them inside the basket, perhaps topping them with a clean linen tea towel or using the basket to store your coffee pods. This masks the plastic texture of the cords with a natural, organic texture.
Another sophisticated move is the Cookbook Stack. Position a stack of 3-4 large, aesthetically pleasing culinary books (think Salt, Fat, Acid, Heat or Persiana) horizontally in front of the wall outlet. By leaning a smaller decorative cutting board or a vintage silver tray against the books, you create a tiered vignette that completely blocks the view of the plugs while keeping them accessible.
3. The 'KitchenAid' Hack: Creative Tucking
For heavy, iconic appliances that stay on the counter 24/7—specifically the KitchenAid Stand Mixer—there is a brilliant community-born trick that costs zero dollars.
For heavy appliances like a KitchenAid mixer, simply unplug the device when not in use and tuck the cord directly into the mixing bowl. You can then place a decorative linen bowl cover or a stack of clean dish towels over the top. This not only maintains a clean, cordless look but also protects the interior of your bowl from dust.
Pro Tip: If you use your mixer frequently, consider an adhesive cord wrap (discussed below) specifically for the back of the stand. However, for those who value a "naked" appliance look, the bowl-tuck remains the cleanest aesthetic choice.
4. Stealth Hardware: Adhesive Wraps and Clips
If you are looking for a budget-friendly way to manage cords on appliances that move around—like blenders, air fryers, or slow cookers—adhesive organizers are your best friend. Products like the "Wrap-It Cable Caddy" or generic silicone cord "clams" allow you to secure the wire directly to the back of the machine.
These solutions typically cost between $8 and $20 for a multi-pack. To install them effectively:
- Clean the back of your appliance with rubbing alcohol to ensure a strong bond.
- Apply the adhesive wrap vertically or horizontally, depending on the machine’s shape.
- Wind the cord tightly and snap the plug into the built-in clip.
This prevents the cord from unravelling and dragging across the counter when the appliance is pushed back against the backsplash. For a truly "stealth" look, use clear adhesive cable clips to route the cord along the very bottom edge of your backsplash, keeping it flush and out of the line of sight.
5. Rerouting the Supply: Sleek Outlet Covers
Sometimes the problem isn't the cord itself, but the bulky plug sticking out two inches from the wall. This creates a gap between your appliance and the wall, which actually makes the cord more visible.
The "Sleek Socket" is a game-changer here. It is an ultra-thin outlet cover that plugs into your existing duplex outlet and provides a thin, flexible extension cord that hangs flat against the wall. You can then hide the actual "jumble" of plugs behind a microwave, a decorative tray, or even under the edge of the upper cabinets. By moving the connection point, you eliminate the "plug-bulge" that often ruins the clean lines of a backsplash.
6. Planning for Permanence: Appliance Garages
If you are in the midst of a kitchen remodel or planning one, the ultimate solution is the Appliance Garage. This is a dedicated cabinet, often with a tambour or pocket door, that sits directly on the countertop.
The secret to a successful appliance garage is integrated power. By placing outlets inside the cabinet, you can leave your toaster and coffee maker plugged in and ready to go. When you're done, you simply close the door, and the clutter vanishes.
Another modern trend is installing "pop-up" outlets directly into the countertop or hidden outlets on the underside of upper cabinets (plug-mold). While more expensive to install, these options provide power exactly where you need it without requiring cords to drape across your beautiful stone surfaces.
7. Simple Cable Bundling: Ties and Wraps
For appliances that have excessively long cords, sometimes all you need is a way to shorten them. Avoid the cheap plastic zip-ties used in garages; instead, look for leather cable straps or silicone gear ties.
Leather straps add a touch of "chef’s kitchen" luxury. Simply bundle the excess cord and snap the leather strap around it. It looks intentional and sophisticated.
Safety Warning: When bundling cords, avoid coiling them too tightly. Tight coils can cause internal wire fatigue or, in high-wattage appliances like air fryers, can potentially lead to heat buildup. A loose "figure-eight" wrap is always safer than a tight circle.
Expert Safety Guide: Managing Kitchen Electrics
While aesthetics are important, the kitchen is a high-risk environment for electrical mishaps. Here is how to manage cords safely:
- Avoid Staples: Never use metal staples to pin cords to the underside of cabinets. Over time, vibration and heat can cause the staple to cut through the insulation.
- Heat Sensitivity: Do not route cords directly behind or over heat-producing elements like the back of a toaster oven or the steam vent of a multi-cooker.
- Airflow: If using a cord management box or riser, ensure there is some ventilation. While most appliances don't generate significant heat through the cord, surge protectors can, especially if multiple items are running at once.
- Water Exposure: Always ensure that cords are not resting in areas where water pools, such as next to the sink or under a leaky espresso machine.
Comparison Table: 7 Solutions at a Glance
| Solution | Best For | Estimated Cost | Aesthetic Impact |
|---|---|---|---|
| Wood Risers | Coffee stations, heavy mixers | $299 - $349 | High / Designer |
| Cookbook Shield | Masking wall outlets | $0 (if owned) | Cozy / Lived-in |
| Baskets | Grouping small appliances | $20 - $50 | Organic / Texture |
| Adhesive Wraps | Blenders, Air Fryers | $8 - $20 | Minimal / Clean |
| Sleek Sockets | Reducing plug bulge | $25 - $35 | Modern / Stealth |
| The 'Bowl Trick' | Stand Mixers | $0 | Ultra-Clean |
| Appliance Garages | Full Renovations | $500+ | Total Concealment |
FAQ
Q: Can I use a regular shoe box to hide cords? A: I wouldn't recommend it. Cardboard is flammable and doesn't dissipate heat well. In a kitchen, you also have to worry about grease and steam, which will degrade cardboard quickly. It's better to invest in a wood, metal, or high-quality plastic box designed for cable management.
Q: Will adhesive wraps damage my appliance's finish? A: Most use 3M command-style adhesives which are safe for plastic and metal. However, if you have a vintage painted appliance, test a small area first. Usually, they peel off cleanly with a bit of heat from a hairdryer.
Q: How do I hide the "cord tail" that goes to the outlet? A: The best way is to use a "backspread" technique—route the cord along the base of the backsplash and place a decorative item (like a salt cellar or a small crock of wooden spoons) directly in front of the path where the cord meets the outlet.
Closing Thoughts
Mastering countertop clutter is less about deprivation and more about curation. You don't have to get rid of your favorite gadgets to have a "Pinterest-perfect" kitchen; you just have to manage the "visual noise" they create. Whether you choose the artisanal route with a walnut riser or the clever styling of a cookbook stack, clearing those cords will make your kitchen feel larger, calmer, and more expensive.